
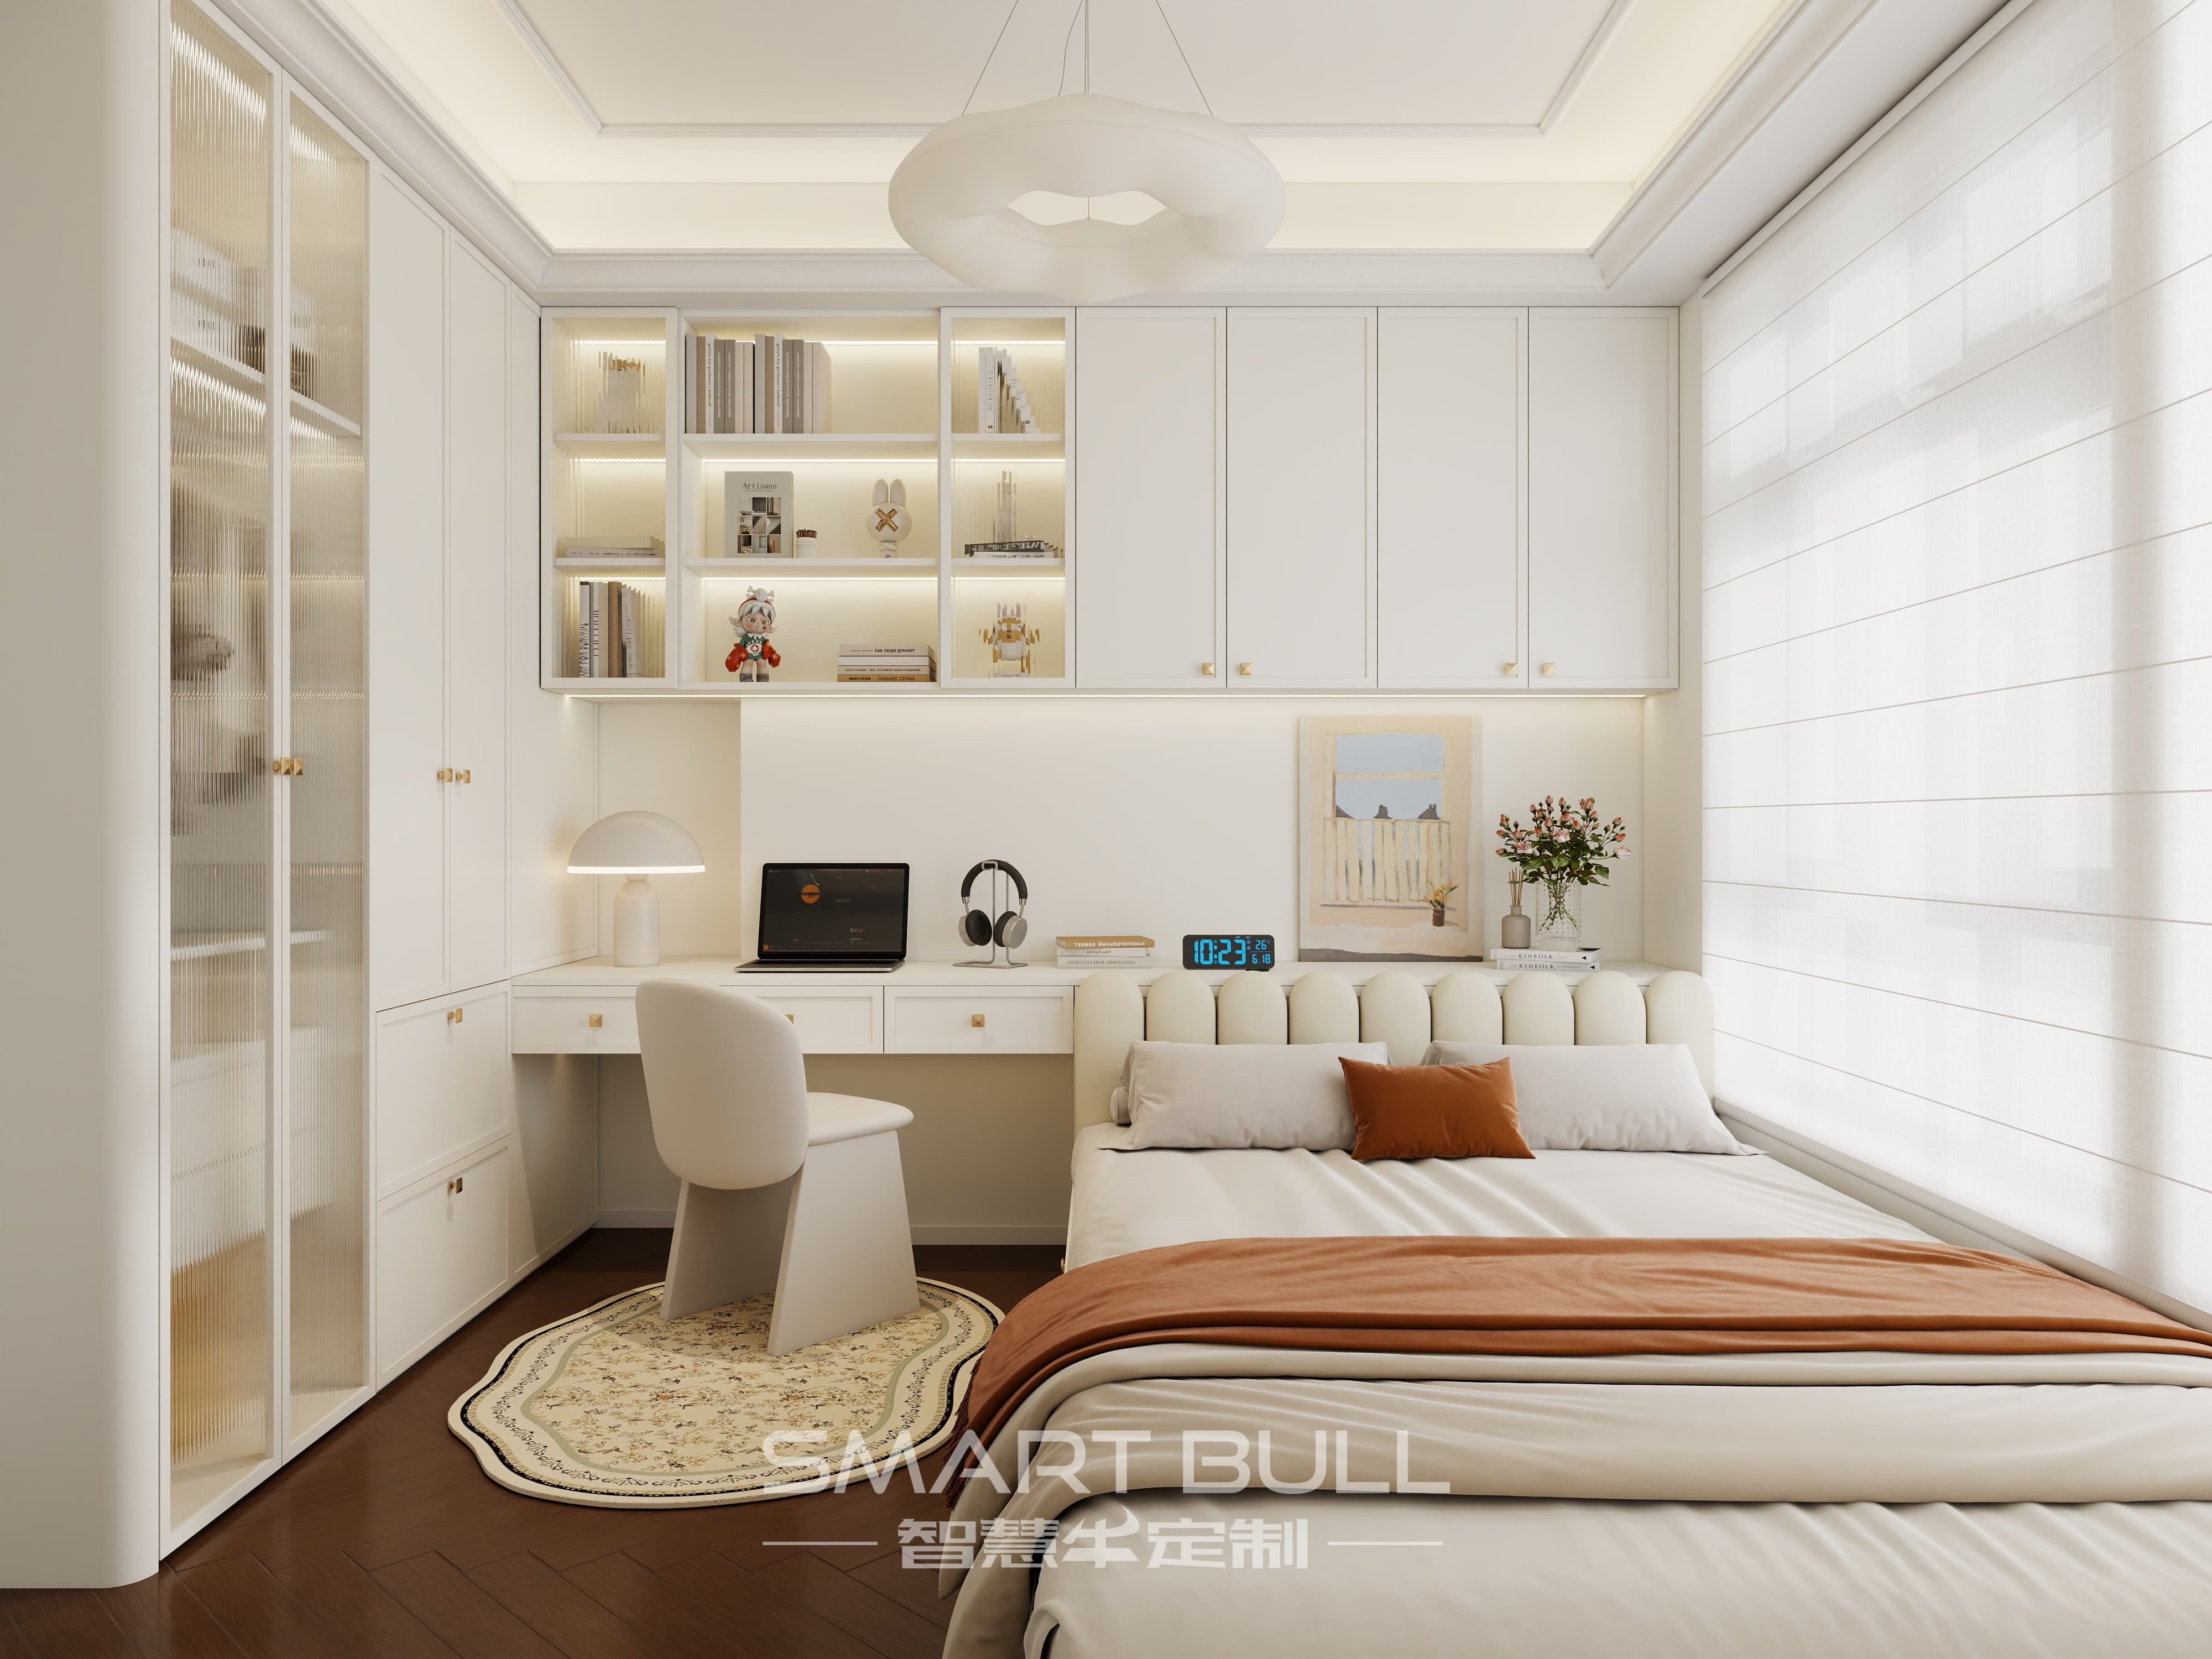
Custom bedroom study desk joined to a wardrobe is the cleanest answer to the work-from-home squeeze in a Singapore flat, because it fuses garment storage and a workspace into one carcass instead of two competing pieces. In a 3-room common room that may only run 2.8 by 2.6 metres, or a master bedroom already holding a queen bed and a wardrobe, a separate desk is usually the item that blocks a door or eats the last strip of floor. This guide works through the ergonomic numbers, the depth trick that makes the combo feel open, and the HDB rules that decide what you can fix to the wall.
Why Join the Desk to the Wardrobe in an HDB Bedroom
The problem with loose furniture is the seams. A freestanding wardrobe stops short of the ceiling, a separate desk leaves a dead corner beside it, and the two never share a panel. A joined unit removes those gaps: one continuous back, one finish, one top line that runs to the ceiling. In a small HDB bedroom that unified run commonly reclaims floor area that three separate items would waste.
The combined unit also conceals the things loose furniture cannot. Cables run inside the carcass to a ventilated niche for the router or set-top box; the desk becomes a recessed shelf rather than a free-standing block; the overhead band above the desk stores luggage and linen that would otherwise sit on top of a standalone wardrobe and collect dust. For a room doing double duty as sleep and work, one built wall is calmer than two fighting ones.
- One carcass means one set of seams, one dust line at the top, one consistent finish.
- Shared end panels let the desk and wardrobe read as a pair, not bolted together later.
- Cable management and task lighting tuck inside the structure instead of draping across the floor.
The Wall Length You Actually Need
A joined wardrobe-and-desk is a linear planning problem before it is a carpentry one. A practical starting footprint is about 2.4 metres of wall: roughly 1.5 metres for the wardrobe and 0.9 metres for the desk. That fits a 3-room or 4-room bedroom wall without swallowing the room, and it leaves the bed wall free.
Pick the configuration from the door swing and the window, not from a catalogue. A linear run places the wardrobe and desk in a row along one wall — simplest and cheapest. An L-shape turns the desk around a corner, useful when the wardrobe wall is short but an adjacent return is free. A niche tucks the desk into a recess between a wardrobe return and a structural element, which suits the tightest rooms. In a 9-square-metre bedroom, a 0.9-metre desk plus 1.5 metres of hanging is enough for both sleep and daily work without blocking circulation.
- Linear: wardrobe + desk in a row, minimum about 2.4 metres of clear wall.
- L-shape: desk on the return wall when the main wall is shorter than 2.4 metres.
- Niche: desk recessed between the wardrobe and a beam or column for the smallest rooms.
The Depth Step-Down That Makes It Work
The single most useful detail in a joined unit is the depth step. Standardise the wardrobe at 600 millimetres deep — that is the depth a hanging rail needs so clothes do not brush the doors. Then step the desk back to 450 or 500 millimetres. That 100 to 150 millimetre recess does two jobs at once.
First, it creates a visual breakpoint so the wall does not read as one oppressive block that swallows the light. Second, it improves chair clearance, because the person sitting at the desk is set back from the wardrobe face. A flush desk at the full 600 millimetres looks tidy on paper but feels claustrophobic in a narrow room, and it steals the knee space the chair needs. The recess is the difference between a workspace that feels dedicated and one that feels buried.
- Wardrobe depth: 600mm for shirts, trousers and coats on a standard hanger.
- Desk depth: step back to 450–500mm for a visual break and better chair room.
- Pull-out extension: a shallow 450mm desk can extend to 600mm on a slide when a bigger surface is needed.
Ergonomic Desk Height and Reach
A joined desk must meet the body, not just the wall. The standard working height in Singapore runs 72 to 76 centimetres from the floor, with 74 centimetres suiting most adults between 158 and 185 centimetres when the chair is adjusted so the forearms sit at a right angle and the feet are flat. Pair it with a chair whose seat height spans roughly 45 to 55 centimetres, and the geometry holds for a full day.
The practical check beats any spec sheet: sit in the intended chair, let the forearms rest parallel to the floor, and measure from the floor to the underside of the elbow. That number is the desk height you want. If it differs meaningfully from 74 centimetres, either raise the chair and add a footrest or specify an adjustable-height top at the carpentry stage. A fixed desk at the correct height serves most users better than a shallow motorised frame that still forces the monitor too close.
- Desk surface: 72–76cm, with 74cm the common fixed height for most adults.
- Chair seat: 45–55cm, adjusted so elbows sit at roughly 90 degrees.
- Feet flat or on a footrest; monitor at or just below eye level, not craned upward.
Desk Depth and Width for Real Work
Depth is the dimension listings underplay. Sixty centimetres of usable depth is the practical minimum for a single-monitor setup: the screen sits at the rear, the keyboard in front, and the eye-to-panel distance lands around 50 to 70 centimetres, which is the safe viewing range. For a dual-monitor or a 27-inch-plus display, 65 to 75 centimetres is more comfortable. Laptop-only work on a stand can manage 55 centimetres.
Width follows the task. A desk 100 to 120 centimetres wide fits a laptop or one monitor plus writing room and suits a 3-room study corner. One hundred and twenty to 140 centimetres is the comfortable working width if the desk occupies the room rather than sharing it, and 140 to 160 centimetres only when the room genuinely has the span. Measure the real working surface, not the outer frame — a raised lip or a fixed cable tray can shave 10 centimetres off a 60-centimetre top.
- Minimum depth 60cm for a monitor; 65–75cm for dual screens or a large display.
- Width 100–120cm for a study corner; 120–140cm for a dedicated workspace.
- Check the clear surface, not the frame, before you commit to the size.
Chair Clearance — the Number People Forget
The desk footprint is only half the planning. The space behind the chair decides whether the room works. Keep at least 900 millimetres between the desk edge and the bed frame so the chair pulls out and a person walks past without turning sideways. Behind and beside the chair, aim for 70 to 90 centimetres of clearance to any obstruction — the wardrobe door, the bed, or the room door.
This is where the depth step pays off again. A recessed 450 to 500 millimetre desk sits the user further from the wardrobe face, so the 900 millimetre desk-to-bed gap is easier to hold. In a 9-square-metre room, protecting that clearance is the line between a workspace you use and one you climb around. Always tape the footprint on the floor and swing the chair before fabrication begins — changes after cutting are expensive.
- Desk edge to bed: at least 900mm so the chair clears the bed.
- Behind and beside the chair: 70–90cm to any wall, door or wardrobe face.
- Tape the footprint and pull the chair out before the carcass is built.
Lighting the Study Nook
A desk tucked into a wardrobe run sits in the room's shadow, so light must be built in. Embed a neutral-white LED strip at 4000 Kelvin directly beneath the overhead shelf for task lighting — that colour renders paper and screens clearly without the warmth that makes a work surface feel dim. Keep ambient bedroom light warm at 2700 to 3000 Kelvin so the room still reads as a bedroom after hours.
Avoid placing the desk facing a window with harsh afternoon sun; the glare fights the screen and the heat loads the laptop. Better to put the wardrobe against the window wall as a thermal barrier and angle the desk to catch diffused light. A small task lamp is redundant if the shelf light is placed right, which also removes one more loose object from the surface. Position the strip so it does not reflect off the monitor into the user's eyes.
- Task light: 4000K LED strip under the shelf above the desk.
- Ambient light: warm 2700–3000K so the room stays restful.
- Desk perpendicular to the window for diffused light; never square-on to afternoon sun.
Vertical Zoning Inside the Combo
A joined unit stores more than clothes, so zone it by how often you reach each level. Set the hanging rail 1,950 to 2,050 millimetres from the floor — accessible for most users without a step stool. Treat the band from 650 to 1,200 millimetres as daily-use space: drawers, folded clothes, the items you touch every morning. Below 650 millimetres holds shoes, bags and heavy items; above 1,850 millimetres holds off-season wear and festive clothing.
The overhead cabinets above the desk are for luggage and bulk linen, not daily things. Stop open shelving about 400 millimetres above the desk surface so you do not crack your head when you lean forward. Build the carcass flush to the ceiling rather than leaving a 20-centimetre gap that becomes a dust shelf; that top band is exactly where infrequently used storage belongs. Push the eye upward and the room reads taller.
- Hanging rail: 1,950–2,050mm from the floor for daily access.
- Daily zone: 650–1,200mm; below 650mm shoes and heavy; above 1,850mm seasonal.
- Overhead shelf stops 400mm above the desk; carcass flush to the ceiling.
Materials That Survive the Humidity
A desk near an air-conditioner vent and a wardrobe against an exterior wall both live in Singapore's relative humidity of 70 to 85 percent, which climbs after an afternoon storm. The carcass choice decides whether the combo looks new in five years. Marine-grade plywood or moisture-resistant board with a high-pressure laminate face and continuous edge-banding is the workhorse; it resists the swelling that low-density particleboard suffers against a damp wall.
Specify low-formaldehyde board — E0 or the tighter ENF grade — for a small bedroom where air change is slow. Near the air-con vent or any spot that sees condensation, ask for a phenolic or wear-resistant surface so the laptop and daily work do not wear the laminate through. Choose heavy-duty soft-close hinges and drawer runners rated for high cycle counts; the desk drawer and wardrobe doors take mechanical stress every single day. Continuous PUR or laser edge-banding seals the core so humid air cannot penetrate the joints.
- Plywood or moisture-resistant board carcass, HPL face, E0 or ENF grade.
- Phenolic or wear-resistant surface near the air-con vent and desk top.
- Heavy-duty soft-close hinges and runners; continuous edge-banding on every cut edge.
Layout Traps: Window, Beam and Services
The back wall hides the details that break a combo. Put the wardrobe against the window wall to act as a thermal barrier, and angle the desk to catch diffused daylight rather than direct sun. A structural beam can become a natural divider between the hanging zone and the desk niche — design around it instead of fighting it. Map every power socket, light switch and air-conditioning trunking before the carcass is drawn; covering a socket wastes a circuit, and sitting a tall panel against copper pipes blocks filter cleaning.
Use the end panel as a shared support so the desk cantilevers from the wardrobe rather than needing its own leg that steals floor. A pull-out extension beneath the main countertop turns a shallow 450-millimetre desk into a 600-millimetre workspace on demand, then slides away. Conceal cabling in PVC conduit to a ventilated compartment, and keep the fan-coil filter access clear with a removable panel if the unit must sit beneath it.
- Wardrobe on the window wall as a thermal barrier; desk angled to diffused light.
- Beam as a natural divider; sockets, switches and AC trunking mapped first.
- Shared end panel supports the desk; pull-out extension adds depth on demand.
HDB Rules You Must Respect
The practical news is that a joined wardrobe-and-desk almost never needs an HDB permit, because it is furniture fixed to an existing wall and touches no structure or service. Built-in wardrobes, platform beds and storage cabinets sit in the no-permit group. The red lines are the same as any bedroom carpentry: you may not hack a structural wall, beam, column or slab, and you may not seal or alter the bomb-shelter door. Non-structural partition walls need a renovation permit, and any structural element needs a Professional Engineer's endorsement before work starts.
Fixings into a concrete wall are limited to 6 millimetres in diameter and 40 millimetres in depth — enough to anchor a wardrobe or desk panel, not to chase services. Lightweight partition walls need a different fixing and often a plywood backer. Renovation noise is restricted to weekday daytime hours with Saturday morning limits and no work on Sundays or public holidays. Engage an HDB-licensed contractor so the workmanship is accountable and the permit line is respected.
- No permit for a built-in wardrobe joined to a desk fixed to existing walls.
- Fixings: 6mm diameter, 40mm depth into reinforced concrete; check partition walls first.
- Keep the fan-coil, DB box and bomb-shelter door accessible; respect noise-window rules.
A Pre-Build Checklist for Your Study Combo
Walk the room with this list and the quote gets shorter, because the variables are settled before the first panel is cut. Confirm the wall length and choose linear, L-shape or niche from the door and window. Decide the depth step — wardrobe 600 millimetres, desk recessed to 450 or 500 — and lock the desk height at 74 centimetres unless the user measures otherwise.
Mark every socket, switch and AC trunking, and keep 900 millimetres from the desk edge to the bed. Build task light at 4000 Kelvin under the shelf and keep ambient warm. Specify plywood or moisture-resistant board with continuous edges and E0 or ENF grade. Hand the ceiling-height measurements and the cornice line to the carpenter at design stage, not after the first sheet is cut. Get these right and the bedroom reads as one calm wall that stores clothes and holds a proper day's work.
- Wall length and layout: linear, L-shape or niche from door and window.
- Depths: wardrobe 600mm, desk recessed 450–500mm; desk height 74cm.
- Clearance: 900mm desk-to-bed, 70–90cm behind the chair.
- Services mapped; 4000K task light, warm ambient; E0/ENF moisture-resistant board.
- HDB-licensed contractor, 6mm by 40mm fixings, no structural wall or bomb-shelter alteration.