
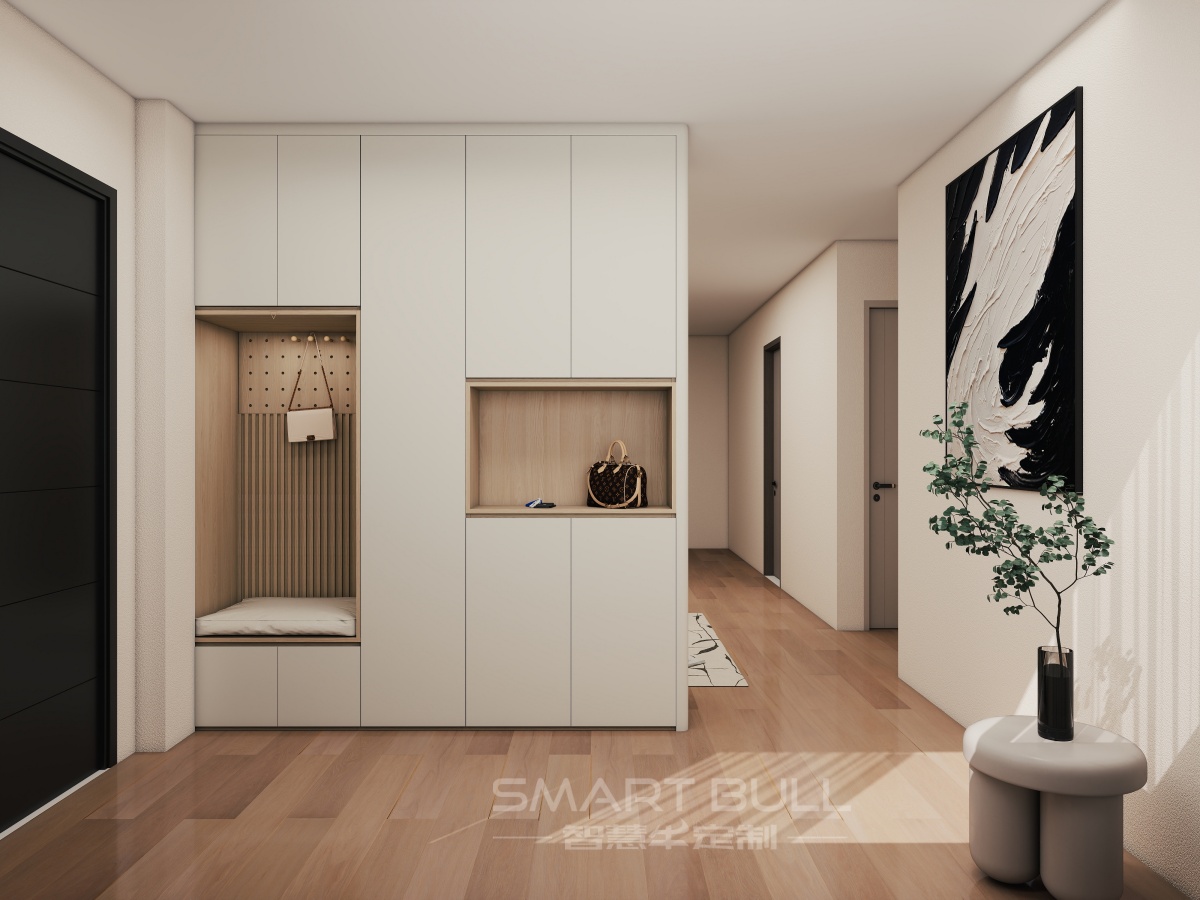
Entryway and foyer carpentry is the first decision that shapes how a flat feels the moment the door opens, yet it is usually the last space a renovation plan gives any thought to. In most Singapore HDB flats the foyer runs only about one to two square metres, the main door opens straight into the living area, and shoes come off at the threshold by habit. That tiny landing has to hold footwear for the whole household, give a place to sit and lace up, and hide an unavoidable electrical distribution board without breaking any rule. Built-in carpentry planned to those three jobs turns a cramped corner into a calm, intentional entrance.
Why the HDB Foyer Earns Proper Carpentry
The foyer is the transition zone between the corridor and your home, so it takes the worst of the weather: dirt from soles, drips from umbrellas, and the damp that rides in on rainy days. Left as an open rack, it becomes the flat's first eyesore and the source of odour that drifts into the living room. A planned cabinet keeps footwear out of sight, gives a drop zone for keys and access cards, and sets the tone before a guest steps fully inside.
It is also the most space-pressured zone in the flat. The landing in a typical BTO measures roughly one to one and a half metres wide before the door swings into the living area, and a cabinet that is even slightly too deep eats the only walkway you have. The win here is precision, not volume: get the depth and the door swing right and the entry feels designed; get them wrong and the whole flat feels smaller from the threshold.
Get the Depth Right Before the Cabinet Goes In
A standard men's shoe runs about 30 to 32 centimetres; a boots or large sneaker reaches 35 centimetres. That is why a cabinet with 30 to 35 centimetres of internal depth handles most footwear lying flat, and it is the depth most HDB entries accept without crowding the passage. Go deeper than 40 centimetres and you gain almost no useful storage while pushing hard into the walkway.
For narrow landings, a slim flip-down cabinet at 17 to 25 centimetres deep stores shoes at an angle on tilted shelves and still holds a respectable count. Reserve at least 70 to 80 centimetres of clear passage after the cabinet sits on the wall, and check the main door and metal gate swing so neither hits the front. A bench seat added on top works best at 40 to 50 centimetres high, and leaving 20 to 25 centimetres of clear space under the bench lets a robot vacuum pass and gives slippers a home.
One more number that saves regret: measure the cabinet against the HDB lift opening, about 0.8 metre wide, and the turn from the corridor into the flat. A tall assembled unit that will not clear that turn is a delivery problem you feel on moving day, not just at the design stage.
Shoe Cabinet Ideas That Fit a Tight Entry
A full-height built-in is the most storage you can get from a BTO foyer: a run from floor to ceiling holds the family's footwear and still leaves the corridor clear, with closed doors keeping visual noise to zero. In a wider foyer it reads as a feature wall; in a narrow one, keep the upper section light or break it with an open shelf so the landing does not feel like a corridor into a cupboard.
For tight landings, a slim cabinet in the gap behind the door uses dead space without blocking anything. An L-shape wraps a corner near the entrance and adds storage without eating the walkway. Mirror-front doors double as a last-minute grooming spot and make a small entry feel larger. Tilted internal shelves roughly double capacity in the same depth compared with flat shelves, because shoes stand upright instead of lying heel-to-toe.
Build in a pull-out tray at the bottom for wet shoes during the monsoon, lined with a drip tray or absorbent mat so water never reaches the flooring. Let that tray ventilate, because sealing damp footwear into a closed box in our humidity is how mould starts. Pair the cabinet with a mirror or a small tray on top for keys and cards, and the function turns into a styled vignette.
Add a Settee That Does Double Duty
A settee, or bench seat, built into the shoe cabinet is one of the most useful details in a Singapore entry, especially where elderly parents or young children live. At 40 to 50 centimetres high it gives a stable surface to sit on while putting on or removing shoes, and the space beneath the seat stores footwear through a front door or an open bay. A padded cushion on top turns a utility item into something you actually want to use.
Plan the settee as part of the cabinet run rather than a separate loose stool, so the corridor stays clear. Drawers below the seat beat a lift-up lid for everyday access, because you pull a drawer without clearing the cushion. Keep the bench at waist height beside a tall storage column, so one side seats and the other stores the bulk of the collection, and the entry works for the whole household at once.
Concealing the DB Box the Right Way
Next to the bomb shelter, the electrical distribution board, the DB box, is the panel every HDB homeowner loves to hide and is not allowed to remove. You cannot take it out, you cannot seal it behind a permanent wall, and you must keep it easy to reach for repairs and for the town council. The trick is to disguise it with a front that opens, not a surface that locks.
A custom carpentry alcove with a hinged or flip-down door over the DB turns the panel into a cupboard that blends with the shoe cabinet finish. A pegboard frame in front of it adds hooks for keys and caps while still lifting away for access. Some households go further and cut a slot so a robot vacuum docks inside the cupboard and drives out to charge. Whatever the cover, it must swing or lift clear of the board with no tools, and the trunking and wiring space behind it stays unobstructed.
The same rule applies to any utility meter or plumbing access panel in the entry: carpentry can sit around it, never across it. If a panel falls inside the footprint you wanted for a full cabinet, shift the run or build a service door into that section. A few minutes of access now prevents a forced break-open later.
Materials and Ventilation for a Damp Threshold
The foyer meets outdoor moisture every day, so the substrate matters as much as in a yard. Choose a moisture-resistant eco-board or plywood at E0 or ENF grade rather than basic particleboard, which warps once a wet sole or an umbrella drip reaches an unsealed edge. Soft-close hinges and metal drawer slides are worth the small premium here, because the cabinet is opened dozens of times a week.
Ventilation is what keeps a closed shoe cabinet from turning into an odour source. Spec louvred door sections, a perforated back panel, or a small air gap at the top and bottom of the carcass so air moves through. Let shoes air for an hour before storing them, and drop a bamboo charcoal or cedar block inside to absorb moisture. For the floor, waterproof slip-resistant luxury vinyl tile handles dirt and drips better than bare tiles and pairs with the living room finish to mark the public-to-private line.
Use light finishes and a mirror to stretch a narrow entry visually, and add a motion-sensor LED strip inside the cabinet so you are not fishing for shoes in the dark. Warm light reads better than clinical cool white at a threshold you use at dawn and midnight alike.
The HDB Boundary in the Entryway
Built-in carpentry such as a shoe cabinet, settee and shelving needs no renovation permit, but it must be carried out by an HDB-registered renovation contractor and stay inside the guidelines. The hard line is access: you must not conceal or block an active electrical distribution board, a utility meter, or a plumbing access panel, and you must not anchor into or damage structural columns, shear walls or precast panels.
Floor load is capped at 150 kilograms per square metre, and raising the floor level with finishes must not exceed 50 millimetres, so a low bench and a thin overlay are fine while a built-up platform is not. Noise works such as drilling and cutting run Monday to Saturday within permitted hours and stop on Sundays and public holidays, and the whole renovation must finish within a three-month permit window. Keep the main door swing, the fire escape route and the common corridor clear, and the entry stays both smart and compliant.
A Pre-Build Checklist for the Foyer
Run through this with the foyer empty, before the carpenter quotes, so the build fits the first time:
1. Measure the landing — width, depth, door and gate swing, and the turn from the corridor, not a rough guess.
2. Fix the depth — 30 to 35 centimetres standard, 17 to 25 centimetres slim, holding at least 80 centimetres of clear passage.
3. Mark the DB box and any meter — design a hinged cover, never a sealed face, with trunking space behind.
4. Plan the settee — 40 to 50 centimetres high, drawers below, 20 to 25 centimetres clear underneath for the vacuum.
5. Build in ventilation — louvred sections or air gaps, tilted shelves, a wet-shoe tray that breathes.
6. Specify the board in writing — moisture-resistant E0 or ENF grade, soft-close hardware, waterproof vinyl floor.
Get those six right and the entrance does three jobs at once: it stores, it seats, and it hides the panel you cannot remove. A foyer planned this way stops being the flat's messy edge and becomes the first well-designed room you walk into.
The same discipline scales across the home: measure the space you actually have, choose substrates for the conditions they face, and build around the routine rather than the look. If you are weighing built-in carpentry beyond the entry, the principles that make a foyer work, clear passage, honest ventilation, and access you must keep, carry straight through to a full-house fit-out planned room by room.