
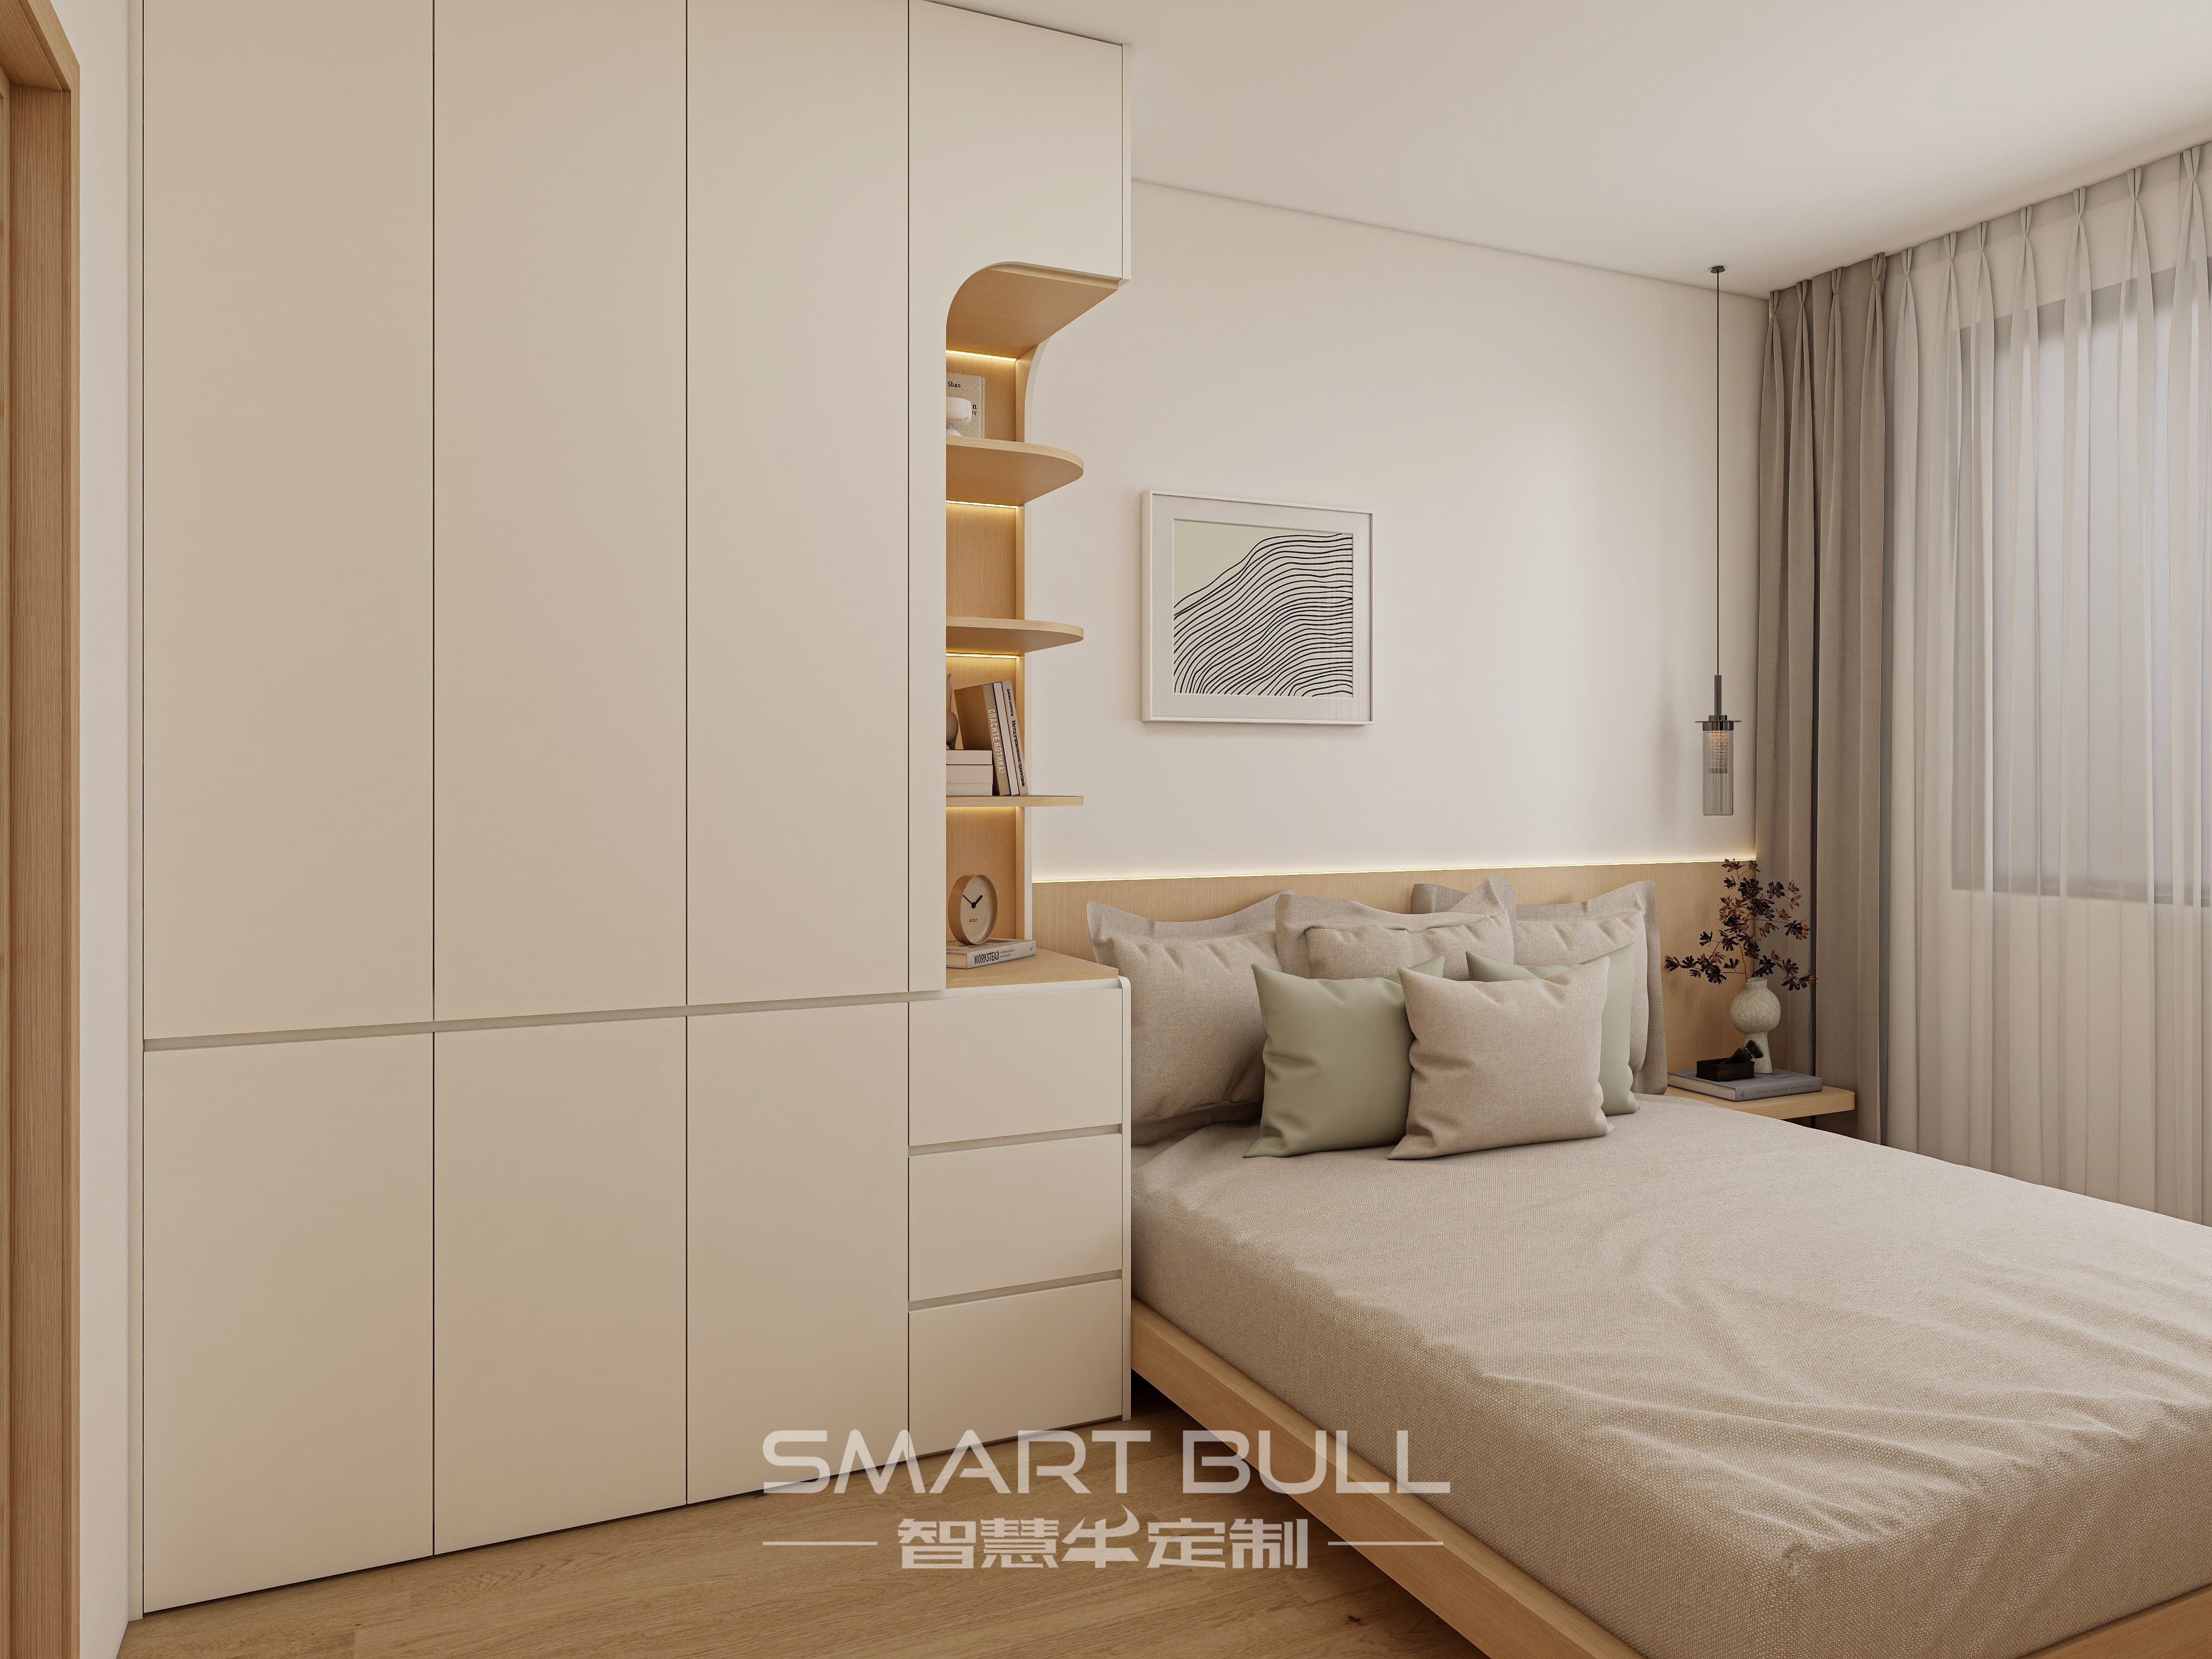
Integrated headboard, nightstand and wardrobe carpentry is the most reliable way to make a narrow Singapore bedroom feel liveable, because it folds three loose pieces of furniture into a single built wall. In a 3-room flat where the common room often measures just 2.8 by 2.6 metres, or a master bedroom running 3.4 to 3.8 metres wide, the few centimetres you save at the bedside add up to a walkway you can actually use. This guide works through the measurements, the clearances and the HDB rules that decide whether the combined run looks seamless or simply cramped.
Why a Narrow HDB Bedroom Rewards One Continuous Run
A narrow bedroom is usually fighting the same problem: the bed takes the middle, a wardrobe needs a wall, and two bedside tables eat the last slice of floor. When those three items are bought separately, each one carries its own shadow gap, its own back panel and its own wasted corner. A single carpentry run removes those gaps and turns the wall behind the bed into storage you already own.
The maths is practical rather than cosmetic. A platform bed with drawers typically recovers 25 to 40 percent of the dead floor volume under the mattress. A headboard that doubles as shelving removes the need for a separate side table. Flanking wardrobes on both sides of the bed turn what was blank wall into hanging space. In rooms under 10 square metres, that combined recovery is often the difference between a bedroom that functions and one you keep tripping through.
- One carcass means one set of seams, one finish, one dust line at the top.
- Shared end panels mean the wardrobe and the bed frame are designed as a pair, not bolted together later.
- You keep the bed centred to the wall instead of shoved sideways to dodge a freestanding wardrobe door.
The 60cm Walkway Rule and How the Wall Frees It
Before drawing anything, settle the circulation space. In an HDB bedroom you want at least 60 centimetres of clear walkway along the sides and foot of the bed, and 90 centimetres is the comfortable target. The trap is that a headboard panel adds 2 to 5 centimetres of depth directly behind the bed, and a freestanding bedside table adds another 40 to 50 centimetres of projection into the room. Integrated carpentry pulls that projection back into the wall plane.
Sliding wardrobe doors are the key lever here. A hinged door needs roughly 45 to 50 centimetres of clear swing in front of it; a sliding door needs zero, because the panel retracts inside the frame. In a narrow room where the gap between the bed and the wardrobe is only 70 to 80 centimetres, sliding doors are almost always the safer pick. Push-to-open or recessed handles keep the face flush so nothing catches the elbow at night.
- Measure the bed-to-wardrobe gap first, then decide the door type — never the other way round.
- If the foot-of-bed gap drops below 60 centimetres, move the bed off-centre or shorten the wardrobe run.
- Floating nightstands or shallow 25 to 30 centimetre drawers reclaim the floor that loose tables steal.
Mapping the Bed Width to the Wall Behind It
The headboard panel must answer to the bed, not the other way round. Standard Singapore widths are fixed: a Single is 91 centimetres, a Super Single 107, a Queen 152 and a King 182. Your panel does one of three things, and each suits a different room size.
A bed-width match keeps the panel exactly as wide as the mattress — 152 centimetres for a Queen, 182 for a King. This is the clean choice for a tight common room because it leaves the adjacent wall free for a wardrobe door to open. An extended panel runs 30 to 60 centimetres past each side of the bed, so a Queen setup spans 212 to 272 centimetres; this anchors the nightstands visually and works in a larger master bedroom with uninterrupted wall length. A full-wall panel runs corner to corner and is best reserved for master bedrooms, where it hides columns, uneven joints and the false-ceiling cornice behind one calm surface.
- Single or Super Single in a 3-room common room: bed-width match, leave the flanks for a 2-door wardrobe.
- Queen in a 4-room master: extended panel to absorb the nightstands, wardrobe on the longer return wall.
- King in a 5-room master: full-wall panel with symmetrical wardrobes flanking both sides of the bed.
The Headboard as a Storage Panel, Not Just a Backrest
Once the headboard is carpentry rather than a bolt-on pad, it becomes the shallowest, most reachable storage in the room. The centre can stay padded or fluted for reading comfort, while the flanks carry open niches for books, a phone, a diffuser and the small things that otherwise scatter across a bedside table.
Upholstered centres add acoustic softness and a backrest you can lean into; fluted or timber-slat centres read warmer and pair with the Japandi look many Singapore homeowners ask for in 2026. Keep the niches shallow — 15 to 20 centimetres is enough for paperbacks and chargers — so the bed does not get pushed forward. A centre panel that is too thick steals the very walkway the integrated run was meant to protect.
- Pad the centre 90 to 110 centimetres wide for a Queen or King so two people can both lean back.
- Use the flanking 25 to 35 centimetre towers for open shelves, not deep cupboards.
- Match the headboard finish to the wardrobe doors so the wall reads as one piece.
Built-in Nightstands With Power and Light
The nightstand is where integration pays off fastest. A floating drawer or a shallow carcass drawer built into the headboard run removes the freestanding table entirely. Build the charging in at the carpentry stage: a 13-amp power point and a USB or Type-C port recessed into the niche, plus a warm LED reading light, deliver a hotel-bedside feel without a single visible cable.
Height matters. The nightstand surface should sit roughly level with the top of the mattress, usually 55 to 65 centimetres from the floor for a standard bed. A drawer 30 to 40 centimetres deep holds medication, chargers and a book; an open shelf below it keeps a phone within reach while it charges. In the narrowest rooms, a flip-down or pull-out shelf gives a temporary surface that disappears by day.
- Recess the power point into the niche and label the circuit before the carcass is closed.
- Specify warm-white reading light at 2700 to 3000 Kelvin, never cool white near the bed.
- Keep at least one open shelf so a glass of water or a phone is not buried in a drawer.
Wardrobe Flanking the Bed: Full-Height, Sliding or Hinged
With the headboard and nightstands absorbed into the wall, the wardrobes flank the bed on one or both sides. Go full-height wherever the ceiling allows: a 2.6-metre BTO ceiling wastes roughly 500 to 600 millimetres if you stop at a 2.0-metre standard unit, and that top band is exactly where luggage and off-season linen belong. Standard depth is 60 centimetres, which gives about 55 centimetres of internal hanging clearance; a sliding-door version can drop to 55 centimetres because it loses the door-swing tolerance.
On the return wall beside a Queen or King, a run of 180 to 240 centimetres is realistic in a 4-room or 5-room master. In a 3-room common room, 80 to 150 centimetres is the honest maximum before the bed gets squeezed. Symmetrical wardrobes on both sides of the bed create the built-in hotel look; a single wardrobe on one return keeps the other side open for a study nook or a window.
- Full-height reclaims 30 to 40 percent more volume than a 2.1-metre unit on the same footprint.
- Sliding doors when the bed-to-wardrobe gap is under 80 centimetres; hinged only with 90 centimetres clear.
- Mirror or glass front panels on a wardrobe reflect light and make a narrow room read wider.
Going to the Ceiling and Around the Beam
Narrow rooms gain the most from vertical height, so plan the run to the ceiling — but measure three times. HDB ceilings run 2.6 to 2.8 metres, yet a cornice beam or false-ceiling valance can cut usable height near the wall. The regulatory minimums are a useful guide: cornices and pelmets need 2.1 metres of clearance from the finished floor, and a false ceiling needs 2.4 metres. Plan the top of any open shelving or cove lighting around those lines, not against the raw slab.
Map the services before the carcass is built. Air-conditioning trunking, the fan-coil unit, light switches and power sockets all live on that back wall. Covering a socket with a wardrobe wastes a circuit; sitting a tall panel against AC copper pipes blocks filter cleaning. Either step the carpentry around the trunking or route the trunking inside the false ceiling during the renovation so the wardrobe can sit flush.
- Measure wall width at floor, mid-height and ceiling — bowed or uneven walls shift the fit by several centimetres.
- Leave the fan-coil and its filter access clear; plan a removable panel if the wardrobe must sit beneath it.
- Use the cornice gap for a cove-light valence rather than letting it collect dust.
Materials That Survive Singapore Humidity
A bedroom wall behind a bed stays warmer and stiller than the rest of the room, and Singapore's relative humidity sits around 70 to 85 percent for much of the year. The carcass choice decides whether the integrated run looks new in five years or bows at the seams. Multi-layer plywood or moisture-resistant (MR) board with a high-pressure laminate (HPL) face and continuous edge-banding is the workhorse: it resists the swelling that generic particleboard suffers against an exterior wall.
Specify low-formaldehyde board — E0 or the tighter ENF grade — especially in a small, closed bedroom where air change is slow. Avoid medium-density fibreboard (MDF) and basic particleboard for any panel that touches an exterior wall or sits near the floor, because their exposed edges are the first to lift. Continuous PUR or laser edge-banding seals the core; a back panel with a 3 to 5 centimetre air gap off the wall lets the surface breathe.
- Plywood or MR-board carcass, HPL face, E0 or ENF board for the bedroom.
- Continuous edge-banding on every cut edge, including the hidden inner shelves.
- Keep the back 3 to 5 centimetres off exterior walls; add a silent-close runner so doors do not slam in the humidity swell.
Lighting and Charging the Integrated Head Wall
The head wall is the one place you touch twice a day, so light and power should be designed in, not taped on. Warm-white LEDs at 2700 to 3000 Kelvin behind a cove valance give ambient glow; a small task light recessed into each nightstand niche handles reading. Motion-sensor strips under the platform or along the floor make night navigation safe without waking a partner.
Charging is simpler when the points are planned with the carpentry. A 13-amp socket plus a USB or Type-C port inside each nightstand niche, routed through concealed conduit to the nearest registered power point, removes the tangle of adapters. Keep the cabling away from the mattress zone and have a licensed electrician make the final connections — bedroom circuits are not a do-it-yourself job under HDB rules.
- Layer ambient, task and accent light; keep all bedroom light warm, not cool white.
- Build charging into the niche, not the surface, so the top stays clear.
- Use concealed PVC conduit so future device swaps do not mean new holes in the carcass.
HDB Rules You Must Respect Before Building
The good news is that integrated bedroom carpentry rarely needs an HDB permit, because it is furniture fixed to an existing wall and touches no structure or service. Built-in wardrobes, platform beds and storage cabinets sit in the no-permit group. The red lines are clear: you may not hack a structural wall, a beam, a column or a slab, and you may not seal or alter the bomb-shelter door. Non-structural partition walls need a renovation permit, and any structural wall needs a Professional Engineer's endorsement before work starts.
Fixings into a concrete wall are limited to 6 millimetres in diameter and 40 millimetres in depth — enough to anchor a wardrobe or headboard panel, not to chase services. Lightweight partition walls need a different fixing and often a plywood backer. Renovation noise is restricted to weekday daytime hours with Saturday morning limits and no work on Sundays or public holidays. Engage an HDB-licensed contractor so the workmanship is accountable and the permit line is respected.
- No permit for built-in wardrobes, platform beds and cabinets fixed to existing walls.
- Fixings: 6mm diameter, 40mm depth into reinforced concrete; check before drilling partition walls.
- Keep the fan-coil, DB box and bomb-shelter door accessible; respect noise-window rules.
A Pre-Build Checklist for Your Narrow Bedroom
Walk the room with this list and the carpentry quote gets shorter, because the variables are settled before the first panel is cut. Confirm the bed size and the walkway you will keep, then decide the headboard width tier and the door type from the gap you measured. Mark every power point, the AC trunking and the window before the wardrobe wall is drawn.
Choose full-height, moisture-resistant board with continuous edges, and build the nightstand charging and light into the carcass rather than onto it. Hand the ceiling-height measurements and the cornice line to the carpenter at design stage, not after the first sheet is cut. Get these right and the narrow bedroom reads as one calm wall instead of three fighting pieces of furniture.
- Bed width and the 60 to 90 centimetre walkway you will keep on each side and at the foot.
- Headboard tier: bed-width match, extended, or full-wall — matched to room length.
- Sliding versus hinged from the measured gap; full-height to a 2.6-metre ceiling.
- Services mapped: sockets, AC trunking, light switch, fan-coil filter access.
- Board grade E0 or ENF, plywood or MR carcass, HPL face, continuous edge-banding.
- HDB-licensed contractor, 6mm by 40mm fixings, no structural wall or bomb-shelter alteration.